Asynchronous and non-Blocking I/O 翻译
Real-time web features require a long-lived mostly-idle connection per user. In a traditional synchronous web server, this implies
devoting one thread to each user, which can be very expensive.
在同步状态下,实时的网络请求会一直占用着一个空的连接,这样每一个用户都会占用着一个线程,很浪费
To minimize the cost of concurrent connections, Tornado uses a single-threaded event loop. This means that all application code should aim to be asynchronous and non-blocking because only one operation can be active at a time.
为了最大限度的利用连接,Tornado使用单线程事件循环的方式。就是使应用采用异步和非阻塞的方式保持着当下只有一个活动的事件,同时又能接收多个应用请求。
The terms asynchronous and non-blocking are closely related and are often used interchangeably, but they are not quite the same thing.
异步和非阻塞这两个术语通常意思一样,但是他们也有不同的地方。
Blocking
A function blocks when it waits for something to happen before returning. A function may block for many reasons: network I/O, disk I/O, mutexes, etc. In fact, every function blocks, at least a little bit, while it is running and using the CPU (for an extreme example that demonstrates why CPU blocking must be taken as seriously as other kinds of blocking, consider password hashing functions like bcrypt, which by design use hundreds of milliseconds of CPU time, far more than a typical network or disk access).
等待这个功能模块返回结果前,函数有很多阻塞的原因,比如:网络I/O、磁盘I/O、互斥操作等。事实上每个功能模块在它运行的时候都会使用一点CPU资源(CPU阻塞必须要当做其它类型的阻塞)
A function can be blocking in some respects and non-blocking in others. For example, tornado.httpclient in the default configuration blocks on DNS resolution but not on other network access (to mitigate this use ThreadedResolver or a tornado.curl_httpclient with a properly-configured build of libcurl). In the context of Tornado we generally talk about blocking in the context of network I/O, although all kinds of blocking are to be minimized.
函数能在一些方面阻塞,在另一些方面不阻塞,***,在Tornado下我们一般讨论的是网络I/O阻塞,其它情况都是很小的。
Tornado里面讨论的阻塞都是指网络阻塞,其它的阻塞可以忽略。
Asynchronous
An asynchronous function returns before it is finished, and generally causes some work to happen in the background before triggering some future action in the application (as opposed to normal synchronous functions, which do everything they are going to do before returning). There are many styles of asynchronous interfaces:
异步函数会在执行结束之前返回,在完成之后通常是一些后台程序去触发预先设定好的处理程序(不像同步程序,必须都做完了才返回)。下面列举了很多种风格的异步接口。
- Callback argument 回调参数
- Return a placeholder (Future, Promise, Deferred) 返回一个占位符
- Deliver to a queue 交付到队列中
- Callback registry (e.g. POSIX signals) 回调到注册表中
Regardless of which type of interface is used, asynchronous functions by definition interact differently with their callers; there is no free way to make a synchronous function asynchronous in a way that is transparent to its callers (systems like gevent use lightweight threads to offer performance comparable to asynchronous systems, but they do not actually make things asynchronous).
无论使用哪种接口,异步函数都会使用不同的方式与调用者交互;没有办法去定义一个同步函数却采用异步的方式调用,对于调用者来说都是透明的(就像采用gevent的轻量级线程系统去提供做到的性能堪比异步系统,但它实际上并不是异步)。
这句话的意思就是说同步的方法没法用异步的方式去调,虽然你写的代码看起来像是异步的,但其实并不是。
Examples
Here is a sample synchronous function:
下面的例子是一个同步函数。
1 | from tornado.httpclient import HTTPClient |
And here is the same function rewritten to be asynchronous with a callback argument:
下面的例子被重写成异步的方式了,采用了回调参数的方式。
1 | from tornado.httpclient import AsyncHTTPClient |
And again with a Future instead of a callback:
下面的例子通过返回一个展位符的方式实现异步回调的。
1 | from tornado.concurrent import Future |
The raw Future version is more complex, but Futures are nonetheless recommended practice in Tornado because they have two major advantages. Error handling is more consistent since the Future.result method can simply raise an exception (as opposed to the ad-hoc error handling common in callback-oriented interfaces), and Futures lend themselves well to use with coroutines. Coroutines will be discussed in depth in the next section of this guide. Here is the coroutine version of our sample function, which is very similar to the original synchronous version:
通过Future的方式实现的更复杂,但是Tornado更建议这样去写,主要有两个原因。从Future返回的错误处理更一致,从Future.result方法可以返回一个简单的异常,Future能够更好的与协同程序一起使用。协同程序的具体讨论将会在下一节讨论,下面的例子给了一个协同程序的例子,写法很像同步的那个版本。
1 | from tornado import gen |
The statement raise gen.Return(response.body) is an artifact of Python 2, in which generators aren’t allowed to return values. To overcome this, Tornado coroutines raise a special kind of exception called a Return. The coroutine catches this exception and treats it like a returned value. In Python 3.3 and later, a return response.body achieves the same result.
这个版本中返回一个raise gen.Return(response.body),在Python2中的用法,因为生成器不允许返回一个值,所以Tornado做了特殊处理,通过跑出一个Return的异常,然后协同程序补货这个异常,就相当于返回值了。在Python3.3以后就可以直接返回这个值了。
Translated by zhangxu on 2016-08-05
正则表达式
正则表达式
用来匹配和处理文本的字符串。基本用途是查找和替换。一种不完备的程序设计语言。
含义列表
1 | . # 英文句号,匹配任意单个字符包括自身,相当于DOS中的 ? ,SQL中的 _ 。 |
懒惰型匹配,匹配最小子集。
1 | +? |
位置匹配
1 | \b # 单词边界 |
回溯引用
下面例子匹配 空格 字符 空格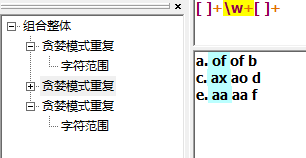
下面的例子使回溯引用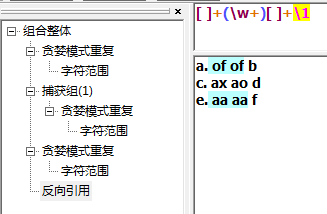
解释回溯引用,\1用来获取(\w+)中的字符串。第一个匹配上的of被\1引用,就变成表达式[ ]+(\w+)[ ]+of。
其中\1代表模式里的第一个子表达式,\2就会代表着第二个子表达式,以此递推。
替换
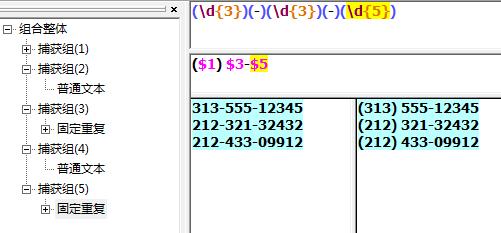
大小写转换测试工具不支持,待测试
向前查找、向后查找
必须要放到一个字表达式中,如下例子,根据:来匹配,但是不消费他。(?=) 向前查找
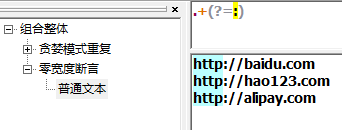
(?<=) 向后查找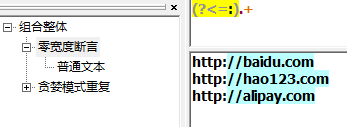
(?!) 负向前查找(?<!) 负向后查找
嵌入条件
(?(brackreference)true-regex)其中?表明这是一个条件,括号里的brackreference是一个回溯引用,true-regex是一个只在backreference存在时才会被执行的子表达式。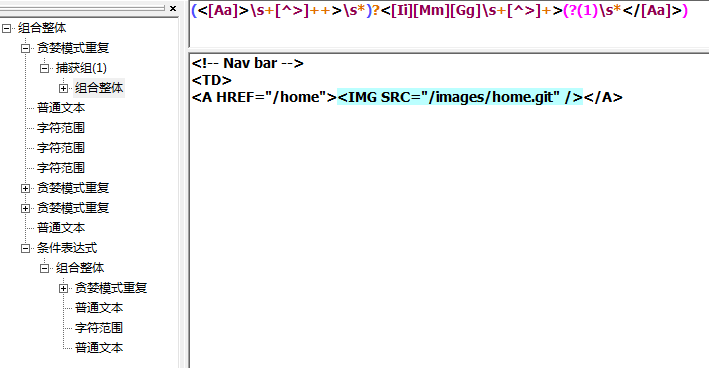
例子
不区分大小写匹配
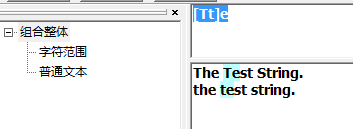
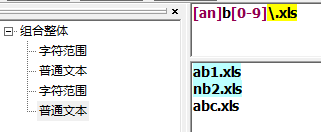
字符区间匹配
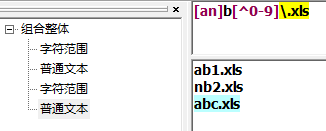
取非匹配
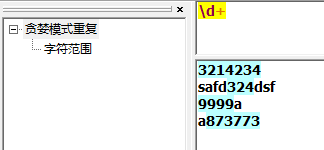
匹配多个字符
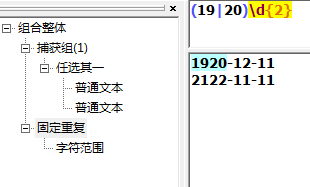
子表达式

匹配四位数的年份
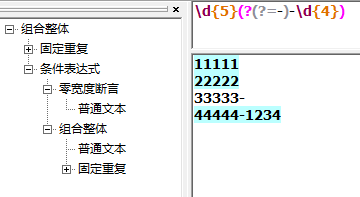
嵌入查找、向后查找组合应用
Python 包管理
pip
pip更新python -m pip install -U pip
pipy国内镜像目前有:
https://mirrors.tuna.tsinghua.edu.cn/pypi/web/ 清华大学
指定源安装
pip可以通过指定源的方式安装 pip install web.py -i https://pypi.douban.com/simple
也可以通过修改配置文件,Linux的文件在~/.pip/pip.conf,Windows在%HOMEPATH%\pip\pip.ini。
1 | [global] |
easy_install
easy_install指定源安装 easy_install -i https://pypi.douban.com/simple
或者修改配置文件 ~/.pydistutils.cfg:
1 | [easy_install] |
easy_install查看包的版本
1 | root@xyz-pc:~# easy_install tornado -v |
安装Python安装包管理工具相关命令
安装easy_install:apt-get install python-setuptools
sudo yum install python-setuptools-devel
esay_install pip
pip指定版本:pip install 'pymongo<2.8'
升级版本:pip install --upgrade pymongo
查看已安装包:pip show --files SomePackage
查看需要更新的包:pip list --outdated
卸载包:pip uninstall SomePackage
帮助:pip --help
指定豆瓣源安装:pip install -i https://pypi.douban.com/simple/ functools32
查看已安装包:pip list
pipenv
安装 pip3 install pipenv
安装虚拟环境 pipenv install
启动虚拟环境 pipenv shell
查看当前环境依赖 pip3 list
退出虚拟环境 exit
安装 pipenv install ……
卸载 pipenv uninstall ……
查看依赖关系 pipenv graph
查看虚拟环境路径 pipenv --venv
删除环境 pipenv --rm
创建 Python3 环境 pipenv --three
Git使用一年总结
git fetch merge
1 | git remote -vv |
git切换远程仓库地址
1 | git remote set-url origin [url] |
使用git在本地创建一个项目的过程
1 | $ makdir ~/hello-world //创建一个项目hello-world |
git设置关闭自动换行
git config --global core.autocrlf false
为了保证文件的换行符是以安全的方法,避免windows与unix的换行符混用的情况,最好也加上这么一句git config --global core.safecrlf true
git tag 使用
1 | git tag # 列出当前仓库的所有标签 |
git pull问题
1 | You asked me to pull without telling me which branch you |
git pull origin new_branch
怎样遍历移除项目中的所有 .pyc 文件
sudo find /tmp -name "*.pyc" | xargs rm -rf替换/tmp目录为工作目录git rm *.pyc这个用着也可以
避免再次误提交,在项目新建.gitignore文件,输入*.pyc过滤文件
git变更项目地址
git remote set-url origin git@192.168.6.70:res_dev_group/test.gitgit remote -v
查看某个文件的修改历史
git log --pretty=oneline 文件名 # 显示修改历史git show 356f6def9d3fb7f3b9032ff5aa4b9110d4cca87e # 查看更改
git push 时报错 warning: push.default is unset
git_push.jpg
‘matching’ 参数是 Git 1.x 的默认行为,其意是如果你执行 git push 但没有指定分支,它将 push 所有你本地的分支到远程仓库中对应匹配的分支。而 Git 2.x 默认的是 simple,意味着执行 git push 没有指定分支时,只有当前分支会被 push 到你使用 git pull 获取的代码。
根据提示,修改git push的行为:
git config –global push.default matching
再次执行git push 得到解决。
git submodule的使用拉子项目代码
开发过程中,经常会有一些通用的部分希望抽取出来做成一个公共库来提供给别的工程来使用,而公共代码库的版本管理是个麻烦的事情。今天无意中发现了git的git submodule命令,之前的问题迎刃而解了。
添加
为当前工程添加submodule,命令如下:
git submodule add 仓库地址 路径
其中,仓库地址是指子模块仓库地址,路径指将子模块放置在当前工程下的路径。
注意:路径不能以 / 结尾(会造成修改不生效)、不能是现有工程已有的目录(不能順利 Clone)
命令执行完成,会在当前工程根路径下生成一个名为“.gitmodules”的文件,其中记录了子模块的信息。添加完成以后,再将子模块所在的文件夹添加到工程中即可。
删除
submodule的删除稍微麻烦点:首先,要在“.gitmodules”文件中删除相应配置信息。然后,执行git rm –cached命令将子模块所在的文件从git中删除。
下载的工程带有submodule
当使用git clone下来的工程中带有submodule时,初始的时候,submodule的内容并不会自动下载下来的,此时,只需执行如下命令:
git submodule update --init --recursive
即可将子模块内容下载下来后工程才不会缺少相应的文件。
一些错误
“pathspec ‘branch’ did not match any file(s) known to git.”错误
1 | git checkout master |
使用git提交比较大的文件的时候可能会出现这个错误
error: RPC failed; result=22, HTTP code = 411
fatal: The remote end hung up unexpectedly
fatal: The remote end hung up unexpectedly
Everything up-to-date
这样的话首先改一下git的传输字节限制
git config http.postBuffer 524288000
然后这时候在传输或许会出现另一个错误
error: RPC failed; result=22, HTTP code = 413
fatal: The remote end hung up unexpectedly
fatal: The remote end hung up unexpectedly
Everything up-to-date
这两个错误看上去相似,一个是411,一个是413
下面这个错误添加一下密钥就可以了
首先key-keygen 生成密钥
然后把生成的密钥复制到git中自己的账号下的相应位置
git push ssh://192.168.64.250/eccp.git branch
等待收集
git add文件取消
在git的一般使用中,如果发现错误的将不想提交的文件add进入index之后,想回退取消,则可以使用命令:git reset HEAD <file>...,同时git add完毕之后,git也会做相应的提示。
git删除文件:
删除文件跟踪并且删除文件系统中的文件file1git rm file1
提交刚才的删除动作,之后git不再管理该文件git commit
删除文件跟踪但不删除文件系统中的文件file1git rm --cached file1
提交刚才的删除动作,之后git不再管理该文件。但是文件系统中还是有file1。git commit
版本回退
版本回退用于线上系统出现问题后恢复旧版本的操作。
回退到的版本git reset --hard 248cba8e77231601d1189e3576dc096c8986ae51
回退的是所有文件,如果后悔回退可以git pull就可以了。
历史版本对比
查看日志git log
查看某一历史版本的提交内容git show 4ebd4bbc3ed321d01484a4ed206f18ce2ebde5ca,这里能看到版本的详细修改代码。
对比不同版本git diff c0f28a2ec490236caa13dec0e8ea826583b49b7a 2e476412c34a63b213b735e5a6d90cd05b014c33
分支的意义与管理
创建分支可以避免提交代码后对主分支的影响,同时也使你有了相对独立的开发环境。分支具有很重要的意义。
创建并切换分支,提交代码后才能在其它机器拉分支代码git checkout -b new_branch
查看当前分支git branch
切换到master分支git checkout master
合并分支到当前分支git merge new_branch,合并分支的操作是从new_branch合并到master分支,当前环境在master分支。
删除分支git branch -d new_branch
git冲突文件编辑
冲突文件冲突的地方如下面这样
1 | a123 |
冲突标记<<<<<<< (7个<)与=======之间的内容是我的修改,=======与>>>>>>>之间的内容是别人的修改。
此时,还没有任何其它垃圾文件产生。
你需要把代码合并好后重新走一遍代码提交流程就好了。
不顺利的代码提交流程
在git push后出现错误可能是因为其他人提交了代码,而使你的本地代码库版本不是最新。
这时你需要先git pull代码后,检查是否有文件冲突。
没有文件冲突的话需要重新走一遍代码提交流程add —> commit —> push。
解决文件冲突在后面说。
git顺利的提交代码流程
查看修改的文件git status;
为了谨慎检查一下代码git diff;
添加修改的文件git add dirname1/filename1.py dirname2/filenam2.py,新加的文件也是直接add就好了;
添加修改的日志git commit -m "fixed:修改了上传文件的逻辑";
提交代码git push,如果提交失败的可能原因是本地代码库版本不是最新。
理解github的pull request
有一个仓库,叫Repo A。你如果要往里贡献代码,首先要Fork这个Repo,于是在你的Github账号下有了一个Repo A2,。然后你在这个A2下工作,Commit,push等。然后你希望原始仓库Repo A合并你的工作,你可以在Github上发起一个Pull Request,意思是请求Repo A的所有者从你的A2合并分支。如果被审核通过并正式合并,这样你就为项目A做贡献了。
创建和使用git ssh key
首先设置git的user name和email:
1 | git config --global user.name "xxx" |
查看git配置:
1 | git config --list |
然后生成SHH密匙:
查看是否已经有了ssh密钥:cd ~/.ssh
如果没有密钥则不会有此文件夹,有则备份删除
生存密钥:
1 | ssh-keygen -t rsa -C "gudujianjsk@gmail.com" |
按3个回车,密码为空这里一般不使用密钥。
最后得到了两个文件:id_rsa和id_rsa.pub
注意:密匙生成就不要改了,如果已经生成到~/.ssh文件夹下去找。
1 | // 暂时无用 |
应用流程未整理
网络上收集
1 | master : 默认开发分支; origin : 默认远程版本库 |
Supervisord总结
常用命令
一、添加好配置文件后
二、更新新的配置到supervisordsupervisorctl update
三、重新启动配置中的所有程序supervisorctl reload
四、启动某个进程(program_name=你配置中写的程序名称)supervisorctl start program_name
五、查看正在守候的进程supervisorctl
六、停止某一进程 (program_name=你配置中写的程序名称)pervisorctl stop program_name
七、重启某一进程 (program_name=你配置中写的程序名称)supervisorctl restart program_name
八、停止全部进程supervisorctl stop all
注意:显示用stop停止掉的进程,用reload或者update都不会自动重启。
supervisord : supervisor的服务器端部分,启动supervisor就是运行这个命令。
supervisorctl:启动supervisor的命令行窗口。
需求:redis-server这个进程是运行redis的服务。我们要求这个服务能在意外停止后自动重启。
安装(Centos)
1 | yum install python-setuptools |
测试是否安装成功:echo_supervisord_conf
创建配置文件:echo_supervisord_conf > /etc/supervisord.conf
修改配置文件,在supervisord.conf最后增加:
1 | [program:redis] |
环境变量配置:
environment=PATH="/usr/local/cuda-8.0/bin:/usr/local/cuda-8.0/lib64",LD_LIBRARY_PATH="/usr/local/cuda-8.0/lib64:$LD_LIBRARY_PATH"
运行命令:
1 | supervisord //启动supervisor |
1 | [root@vm14211 ~]# supervisorctl |
1 | ctl中: help //查看命令 |
遇到的问题
redis出现的不是running而是FATAL 状态
应该要去查看log
log在/tmp/supervisord.log日志中显示:
gave up: redis entered FATAL state, too many start retries too quickly
修改redis.conf的daemonize为no
事实证明webdis也有这个问题,webdis要修改的是webdis.json这个配置文件
参考
http://www.cnblogs.com/yjf512/archive/2012/03/05/2380496.html
分布式系统常用指标
性能指标
- 吞度量
- 响应延迟 P95 P999
- 并发量
可用性指标
- 可提供的服务时间 / (可提供的服务时间 + 不可提供的服务时间)
- 请求成功次数 / 总请求次数
可扩展性指标
是否能实现水平扩展,通过增加服务器数量增加计算能力、存储容量等。
存储系统中有两种扩展方式:
Scale Out(也就是Scale horizontally)横向扩展,比如在原有系统中新增一台服务器。
Scale Up(也就是Scale vertically)纵向扩展,在原有机器上增加 CPU 、内存。
一致性指标
实现多副本之间一致性的能力。不同的应用场景对于数据一致性指标要求不同,需要根据场景做具体的评估。
水平拆分和垂直拆分
ACID
原子性(Atomicity)
一致性(Atomicity)
隔离性(Isolation)
持久性(Durability)
CAP(帽子理论)
一致性(Consistency)
可用性(Availability)
可靠性(Partition tolerance 分区容错性)
BASE
基本可用(Basically Available)
软状态(Soft State)
最终一致(Eventually Consistent)
分布式一致性协议
TX协议
XA协议
两阶段提交协议
三阶段提交协议
TCC
最终一致性模式
Crontab计划任务
编辑 Crontab 文件: crontab -e
查看 Crontab 日志: tail -100f /var/log/cron
基本格式 :

* * * * * command
分 时 日 月 周 命令
第1列表示分钟1~59 每分钟用*或者 */1表示
第2列表示小时1~23(0表示0点)
第3列表示日期1~31
第4列表示月份1~12
第5列标识号星期0~6(0表示星期天)
第6列要运行的命令
Crontab文件的一些例子:
30 21 * * * /usr/local/etc/rc.d/lighttpd restart
上面的例子表示每晚的21:30重启apache
45 4 1,10,22 * * /usr/local/etc/rc.d/lighttpd restart
上面的例子表示每月1、10、22日的4 : 45重启apache
10 1 * * 6,0 /usr/local/etc/rc.d/lighttpd restart
上面的例子表示每周六、周日的1 : 10重启apache
0,30 18-23 * * * /usr/local/etc/rc.d/lighttpd restart
上面的例子表示在每天18 : 00至23 : 00之间每隔30分钟重启apache
0 23 * * 6 /usr/local/etc/rc.d/lighttpd restart
上面的例子表示每星期六的11 : 00 pm重启apache
* */1 * * * /usr/local/etc/rc.d/lighttpd restart
每一小时重启apache
* 23-7/1 * * * /usr/local/etc/rc.d/lighttpd restart
晚上11点到早上7点之间,每隔一小时重启apache
0 11 4 * mon-wed /usr/local/etc/rc.d/lighttpd restart
每月的4号与每周一到周三的11点重启apache
0 4 1 jan * /usr/local/etc/rc.d/lighttpd restart
一月一号的4点重启apache
遇到的坑
* 1 * * * 这样写的话会每天1点的每分钟执行一次,需要写成 0 1 * * * 这样的形式
Tornado学习总结
框架
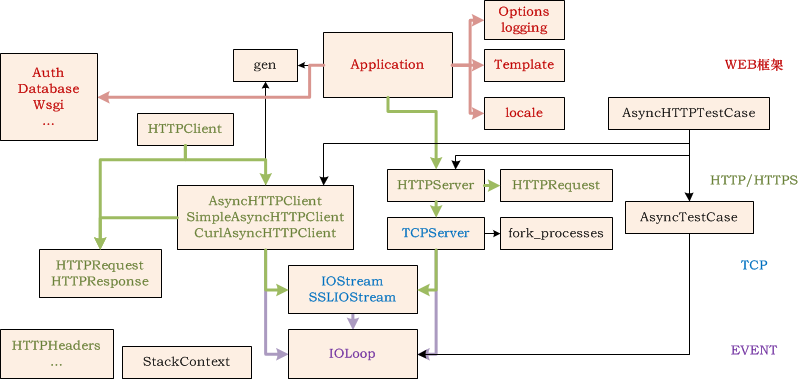
四层
- WEB框架(处理器、模板、数据库连接、认证、本地化等)
- HTTP/HTTPS层(基于HTTP协议实现了HTTP服务器和客户端)
- TCP层(TCP服务器,负责数据传输)
- EVENT层(处理IO事件)
============================================================
基础用法学习
请求处理程序和请求参数
程序将URL映射到tornado.web.RequestHandler的子类上去。
1 | class MainHandler(tornado.web.RequestHandler): |
get_argument() 方法获取查询字符串参数。self.request.files 可以访问上传文件。
在继承类中通过 self.request.arguments.items() 方法获取所有返回对象。
重写RequestHandler的方法函数
程序调用 initialize() 函数,这个函数的参数是 Application 配置中的关键字 参数定义。initialize 方法一般只是把传入的参数存 到成员变量中,而不会产生一些输出或者调用像 send_error 之类的方法。
程序调用 prepare()。无论使用了哪种 HTTP 方法,prepare 都会被调用到,因此 这个方法通常会被定义在一个基类中,然后在子类中重用。prepare可以产生输出 信息。如果它调用了finish(或send_error` 等函数),那么整个处理流程 就此结束。
程序调用某个 HTTP 方法:例如 get()、post()、put() 等。如果 URL 的正则表达式模式中有分组匹配,那么相关匹配会作为参数传入方法,见下图:
见 code 1,RequestHandler中一些方法函数需要在其子类中重新定义handler\base.py
get_current_user() 处理获得当前用户
重定向
通过 self.redirect 或 RedirectHandler。
1 | application = tornado.wsgi.WSGIApplication([ |
模板
模板支持 { % 控制语句 % }、{ { 表达式 } }
可以通过 extends 和 block 实现模板继承。
Cookie和Cookie安全
通过下面方式加强安全性
1 | class MainHandler(tornado.web.RequestHandler): |
另一种配置写法:
1 | class MainHandler(BaseHandler): |
@tornado.web.authenticated 用于用户认证cookie_secret用于加密cookielogin_url 记录重定向地址xsrf_cookies 开关XSRF防范机制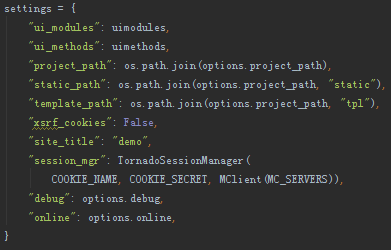
静态文件和主动式文件缓存
"static_path": os.path.join(os.path.dirname(__file__), "static")
static_url() 函数会将相对地址转成一个类似于 /static/images/logo.png?v=aae54 的 URI,v 参数是 logo.png 文件的散列值, Tornado 服务器会把它发给浏览器,并以此为依据让浏览器对相关内容做永久缓存。
由于 v 的值是基于文件的内容计算出来的,如果你更新了文件,或者重启了服务器 ,那么就会得到一个新的 v 值,这样浏览器就会请求服务器以获取新的文件内容。 如果文件的内容没有改变,浏览器就会一直使用本地缓存的文件,这样可以显著提高页 面的渲染速度。
本地化
UI模块
1 | class HomeHandler(tornado.web.RequestHandler): |
非阻塞式异步请求
Tornado 当中使用了 一种非阻塞式的 I/O 模型,所以你可以改变这种默认的处理行为——让一个请求一直保持 连接状态,而不是马上返回,直到一个主处理行为返回。要实现这种处理方式,只需要 使用 tornado.web.asynchronous 装饰器就可以了。
调试模式和自动重载
如果你将 debug=True 传递给 Application 构造器,该 app 将以调试模式 运行。在调试模式下,模板将不会被缓存,而这个 app 会监视代码文件的修改, 如果发现修改动作,这个 app 就会被重新加载。在开发过程中,这会大大减少 手动重启服务的次数。然而有些问题(例如 import 时的语法错误)还是会让服务器 下线,目前的 debug 模式还无法避免这些情况。
分治策略之最大子数组问题
- 最简单直接的是暴利遍历数组可求得最大子数组,时间复杂度为O(n^2)
- 采用分治策略将数组分为两个子数组去求解右如下三种情况:
- 最大子数组在左子数组中。
- 最大子数组在右子数组中。
- 最大子数组跨越两个子数组中。
重点在于求最大子数组跨越两个子数组的情况。
从数组的中间点为一定点向左和向右遍历分别求得最大子数组。
然后相加得跨越两个子数组的最大子数组。
然后采用递归的方法将左子数组和右子数组继续拆分,最后当左右子数组为一个元素时结束返回。
在递归的每一层中计算完三种情况后选取当下的最大子数组情况返回。
最后得到的结果便是连续最大子数组。
采用分治策略的时间复杂度为O(nlogn)
1 | import random |